Introduction
![]()
OSA-Mailer engine allows you to send dynamic and sophisticated E-mails, using Smart Templates
O.S.A stands for: Open Smart Alert
Open
It is a free and open-source feature-rich backend engine for sending automated E-mails.
Smart
It is using sophisticated, programable HTML templates ("Smart Templates") that can provide advanced capabilities when producing E-mails.
Alert
It is designed in the context of alerting or notifying about events and elegantly providing relevant context about them. (It can also be used to send newsletters, but for now you'll have to handle your own subscriptions backend services).
Main Features
- Manages different smart templates for different categories of your choice
- Identifies a common denominator for multiple E-mails and merges them into a single E-mail with accumulated context as an optional feature to reduce spam
- Supports multiple template engines with large communities and great support:
Tera,LiquidandHandlebars - (To be implemented) Allowing custom functionalities such as embedding dynamic QRCodes or defanging untrusted URLs, IP Addresses and E-mail addresses
- More community ideas to follow...
Smart Templates & Marketplace
Logically separates the front-end, back-end and data layers which should allow for easier community adaption (one is not required to understand all layers when using, maintaining or configuring the tool)
-
Develop or use ready Smart Templates that are programmed to act differently upon varying data inputs
-
(WIP) Download or share Smart Templates with the community marketplace
Minimalist & Reliable
It is written in the Rust programming language which is both highly reliable and packs all mentioned capabilities in a single, small, high-performing executable (Cloud friendly).
MVP Status
The project is still in Minimum Viable Product state and is subject to constant change.
OSA-Mailer Setup
Preface
Currently, OSA-Mailer simply checks its outbox directory each time it is executed. As the development is proceeding towards a stable, complete version, OSA-Mailer is currently built only for Windows (i686 to support both 32bit and 64bit architectures) but of course the source code could be built into any architecture that is supported by LLVM & Rust.
If you wish for an early build for Linux, or any other architectural build, feel free to open a discussion about it.
Since at this stage there is no point to invest in an installer, nothing special is required but to extract OSA-Mailer from its 7zip archive and to execute the binary on regular cycles (1 minute, 10 minutes, etc.).
The following chapters will provide step-by-step instructions on how to configure and deploy OSA-Mailer.
Download the most current 7zip archive (.7z) asset of OSA-Mailer from the releases page (e.g. osamailer-alpha-3_windows-pc-i686.7z) and follow the instructions in the following chapters.
Roadmap
- Windows Service (Installer)
- *nix Service (Package)
Windows Setup
Preface
At this stage of the development, there is no installer.
Currently the way to use OSA-Mailer is it have an external system to run its run script osa_mailer.cmd
Preparations
Download
Steps:
- Get to the releases page
- Pick the latest version of OSA-Mailer
- Expand the
Assetstitle by clicking on it- Pick the
.7z7-zip archive file for Windows and click on it to start downloading
Extract
In order to extract a 7-zip archive, you need an extractor that supports it. Your best bet is probably to download the official 7-zip from its website https://www.7-zip.org/
Steps:
- Extract the archived file from the
Downloadsection anywhere you like, but make sure you will have controlled access to the extractedoutboxdirectory as this directory serves clients as a gateway for sending E-mails
Configure
osa_mailer.cmd::: Configurations SET SERVER=localhost SET PORT=25 SET AUTH=noauth ::SET USERNAME=username ::SET PASSWORD=passwordSteps:
- Edit the script file
osa_mailer.cmdwith your favorite text editor- Look for the
:: Configurationscomment- Notice the
SETstatements which set each environment variable for OSA-Mailer- Configure each environment variable accordingly
Environment Variable Description Mandatory SERVERSMTP server IP address or hostname (e.g. Gmail, Outlook, SMTP relay-proxy, etc.) ✅ PORTThe TCP port number for the SERVERvariable✅ AUTHAuthentication method: TLS,STARTTLSorNOAUTH✅ USERNAMEProvides the username when using an authentication method other than NOAUTH❌ PASSWORDProvides the password when using an authentication method other than NOAUTH❌
- To uncomment a variable, remove the double-colons
::from itsSETstatement (e.g.::SET USERNAME=usernamebecomesSET USERNAME=username)
Setup a Task for Windows Task Scheduler
Windows Task Scheduler can be used as a means to trigger and activate OSA-Mailer, but it is not a requirement in case it doesn't fit your use-case.
Open the Windows Task Scheduler
Here are a few links to external articles on different methods to launch the Windows Task Schedular:
Here is one way to do this:
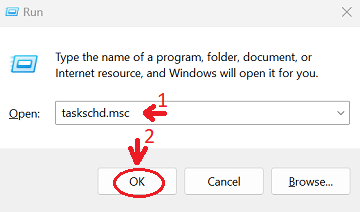
In order to open the Windows Task Schedular, we will use aRuncommand:
- Hold the
Windowsbutton + press theRbutton- This should open the
Runwindow- Type in:
taskschd.mscand either click theOKbutton or press theENTERkey
Create a new Task
It is recommended to create the task within a dedicated folder so it will be easier to maintain and not mix-up with other unrelated tasks.
Steps:
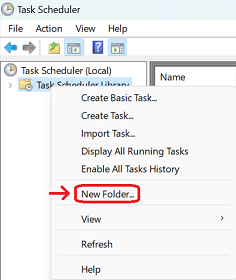
- On the left pane, select the
Task Scheduler Librarydirectory by clicking on it once with theLEFT MOUSE BUTTON- Once selected,
RIGHT MOUSE BUTTONclick on the already selectedTask Scheduler Library, to open the actions menu- Select
New Folder...from the actions menu
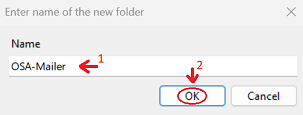
- Pick a proper name (
OSA-Maileris recommended) and either click on theOKbutton or press theENTERkey
- Select the newly created folder by a single
LEFT MOUSE BUTTONclick
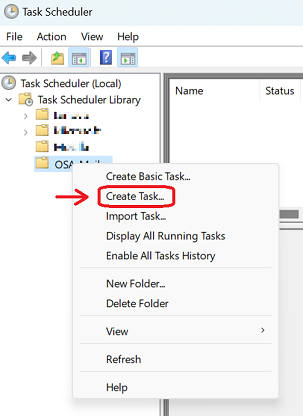
- Once selected,
RIGHT MOUSE BUTTONclick on it again to pop the actions menu- Select the
Create Task...from the actions menu
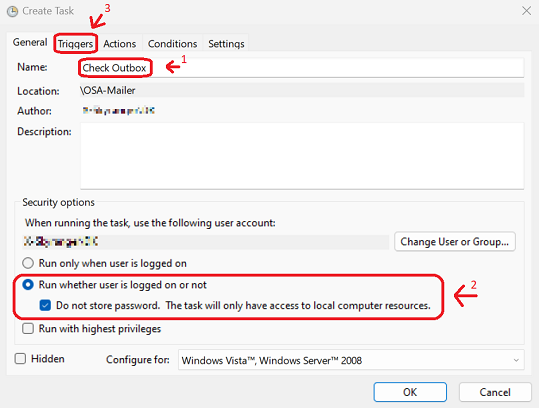
- The
Create Taskwindow will pop-up- Provide the name for the task:
Check Outbox(recommended)- Under
Security options, select theRun whether user is logged on or notand check theDo not store password. The task will only have access to local computer resources.checkbox- Click on the
Triggerstab
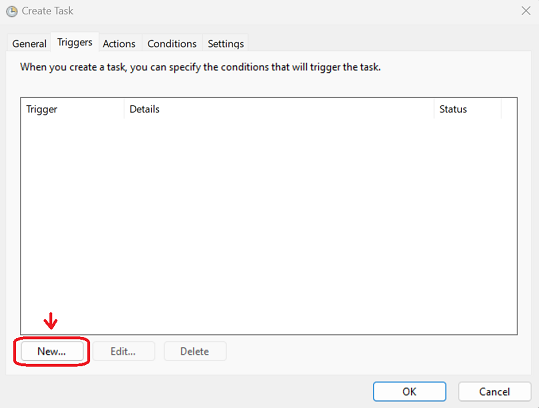
- On the
Triggerstab, click on theNew...button to create a new trigger
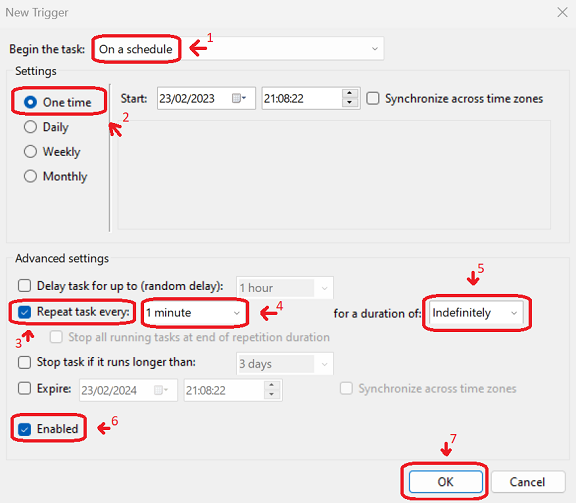
- The
New Triggerwindow will pop-up- Make sure that
Begin the task:is set toOn a schedule- Make sure that
Settingsis set onOne time- Under
Advanced settings, make sure that theRepeat task every:checkbox is checked- (Recommended): Manually copy the value
1 minuteand assign it- Make sure that
for a duration of:is set toIndefinitely- Make sure that the
Enabledcheckbox is checked- Click on the
OKbutton to the add the trigger
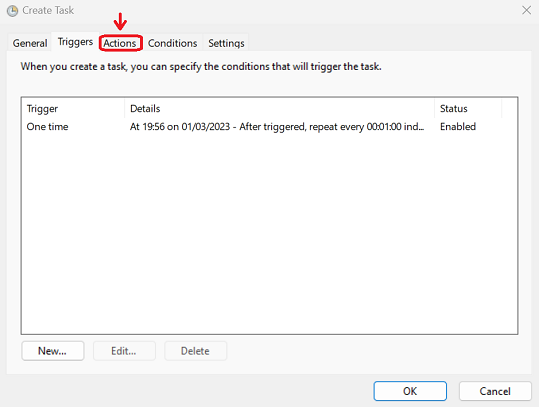
- Click on the
Actionstab
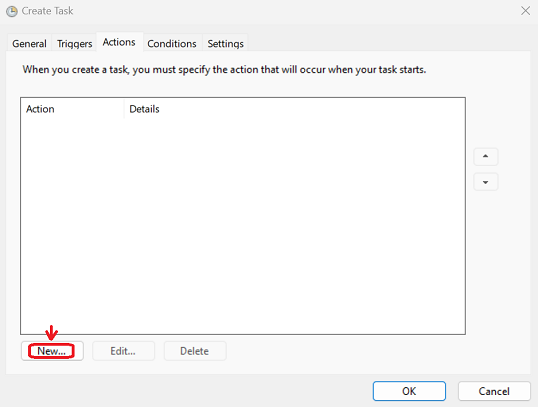
- On the
Actionstab, click on theNew...button to create a new action
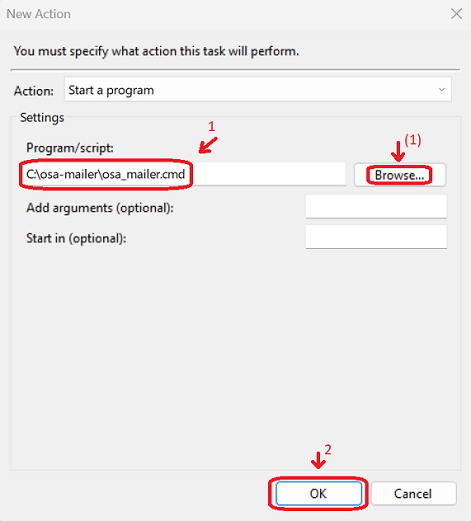
- The
New Actionwindow will pop-up- Under the
Program/script:textbox, assign the path to where theosa_mailer.cmdfile is located
- Optional: You can click on the
Browse...button to locate theosa_mailer.cmdfile
- Click on the
OKbutton to add the action
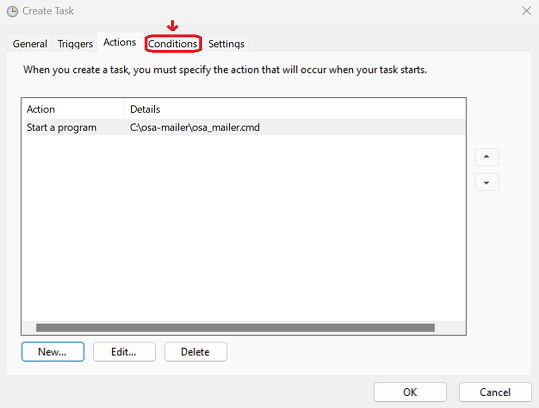
- Click on the
Conditionstab
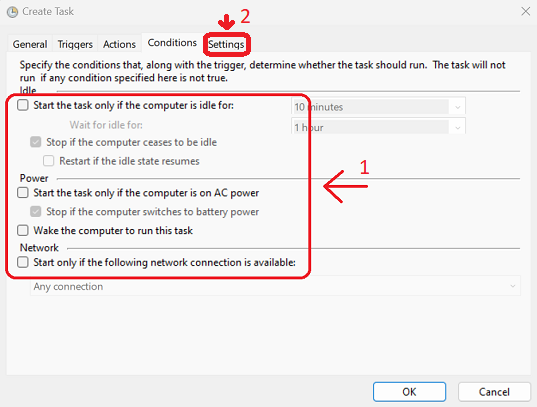
- Make sure that there are no conditions in place and all checkboxes are unchecked
- Click on the
Settingstab
- Make sure that only the following checkboxes are checked:
Allow task to be run on demandRun task as soon as possible after a scheduled start is missedIf the running task does not end when requested, force it to stop- Make sure that the field
If the task is already running, then the following rule applies:has the valueDo not start a new instancein its dropbox- Make sure the rest of the checkboxes are unchecked
- Click on the
OKbutton to create the task
- We are finished. You can close the Windows Task Scheduler

Sending an E-mail
On every run, OSA-Mailer is scanning its outbox directory for new E-mail entries.
Each E-mail entry is represented as a JSON document file.
An E-mail entry can be though of as just a single "send E-mail" request that contains all details required to send it.
When attempting to send multiple E-mails to the same recipients, on the same subject, having a common denominator, they are all considered to be E-mail entries that compose the same, single E-mail ("Composed E-mail"), that represents the final product to be sent to your recipients.
You can have a relation of multiple E-mail entries per one composed E-mail or one E-mail entry per one composed E-mail. It depends on your personal configurations.
Once the E-mail entry is processed and sent successfully, it is deleted from the outbox directory.
🚨 If the
.jsonentry file is not deleted from theoutboxdirectory, then an error might have occurred. You can check thelogsdirectory to get more details about the errors.
Outbox Directory
In order to send an E-mail, we have to produce an E-mail entry which is a JSON document that contains all details required to send it, and place it in the outbox directory.
Using the outbox directory, enables us advanced features such as accumulating multiple E-mails into a single one that is containing accumulate context within its contents. This reduces spam in our recipients' inbox and provides them with more concise E-mails.
Other future features are in-bound such as delayed E-mails, etc. All of these features and more, are only possible to achieve when using an outbox directory to accumulate E-mails.
Notice: In the future, we may use a database or provide an option for a database. For our MVP, we just put JSON files in the
outboxdirectory
Example
📦osa_mailer
┣ 📂outbox 👈
┃ ┣ 🗎my_non_standard_email_entry.json
┃ ┣ 🗎a40a6508.3b0c7586049dd2.c8e7d381.3e5f6e98.json
┃ ┗ 🗎a40a6508.3b119a8fafdc3a.72e3d49e.fc982089.json
...
E-mail Entry Name Convention
The following describes the current, non-binding standard for E-mail entry file name convention:
{
E-mail ID}.{Timestamp}.{Entry ID}.{Checksum}.json
| Field | Description |
|---|---|
E-mail ID | A unique ID to identify the E-mail, produced by hashing the email part of the entry, encoded in hexadecimal |
Timestamp | Creation time in nanoseconds, encoded in hexadecimal |
Entry ID | A unique ID to identify the entry, extracted from the entry itself |
Checksum | A unique CRC32 checksum of the entire entry file, encoded in hexadecimal |
🚨 The file name convention isn't mandatory but it helps in debugging and avoiding coalitions when auto-generating E-mail entries. The standard is embedded in the
new_entry.pyscript file which is located under themail_producerdirectory
The following chapters will demonstrate how to compose an E-mail entry JSON document.
Common E-mail Entry
The following example represents an E-mail entry.
Currently, it is mandatory to be explicit about all possible fields. However it is not required to fill every possible field.
In the following examples, we will explain the roles of every key and JSON object.
Entry Object Structure
Here is the base structure of every E-mail entry:
Example
{
    "id": "<ENTRY ID>",
    "utc": "<SEND TIMESTAMP IN UTC ISO 8601 RFC3339 FORMAT>",
    "notify_error": [ "<OPTIONAL E-MAIL ADDRESS FOR ERROR NOTIFICATIONS>" ],
    "email": {
        "<KEY-VALUE>": "<KEY-VALUE INPUTS, DESCRIBING HOW TO SEND THE E-MAIL>"
    },
    "context": {
        "<KEY-VALUE>": "<KEY-VALUE INPUTS, DESCRIBING THE DATA FOR THE HTML TEMPLATE>"
    }
}
The structure above is common among all E-mail entries. What varies are the assigned values.
| Data Name | Data Type | Description |
|---|---|---|
id | string | A unique ID provided by the entry generator. There is no mandatory standard. The only requirement is that each entry must have a unique value |
utc | string | A UTC timestamp value in the ISO 8601 RFC3339 standard |
notify_error | array of strings | A list of E-mail addresses to be notified about errors (not implemented yet) |
email | object | A dictionary or map of values that describes the E-mail to be sent. e.g. subject, recipients, attachments, HTML template, etc. |
context | object | Context variables for the HTML template |
E-mail Object Structure
The email object within the entry object, is composed of the following structure:
Example
{
    "email": {
        "system": "My Automations System",
        "subsystem": "[ID:12345] Trigger: Server Disk Out-of-Storage",
        "from": "Ops Auto-Mailing System <tech-support@example.com>",
        "reply_to": [
            "System Admin <admin@example.com>",
            "Project Lead <lead@example.com>"
        ],
        "to": [ "Rick S. <rick_s@example.com>" ],
        "cc": [],
        "bcc": [],
        "subject": "ATTENTION! Your server is out-of-storage",
        "template": "ops_department",
        "alternative_content": "Unable to render HTML. Please refer to the Ops department for details.",
        "attachments": [],
        "unique_by": ""
    }
}
| Data Name | Data Type | Description |
|---|---|---|
system | string | The name of the external system that uses OSA-Mailer |
subsystem | string | The name of the subsystem that uses OSA-Mailer. e.g. Name of the trigger or rule that fired or activated OSA-Mailer, within the external system |
from | string | The E-mail address of the sender |
reply_to | array of strings | An optional array of E-mail addresses to re-direct replies to |
to | array of strings | An array of E-mail addresses representing the To: recipients |
cc | array of strings | An array of E-mail addresses representing the Cc: copy to recipients |
bcc | array of strings | An array of E-mail addresses representing the Bcc: hidden recipients |
subject | string | The E-mail subject |
template | string | The selected template for the message body, located under the templates directory |
alternative_content | string | The message to be displayed for clients that cannot render the HTML body of the message. Some E-mail clients use this value for message preview |
attachments | array of strings | An array of file paths to attach |
unique_by | string | An optional aid field to assist in generating a unique E-mail ID by providing custom values. This provides us the ability to affect how E-mails are accumulated |
The entire
Context Object Structure
The context object within the entry object, can be freely composed of any JSON value. Every key within the context object, is passed down to the selected template
Example
The following JSON context, can be accessed within its following HTML template example:
{
    "context": {
        "message": "Hello, world!",
        "items": [ "apple", "orange", "watermelon" ]
    }
}
HTML template using the handlebars engine for rendering:
<!--TEMPLATE handlebars-->
<!DOCTYPE html>
<html lang="en">
<head>
    <meta charset="UTF-8">
    <meta name="viewport" content="width=device-width, initial-scale=1.0">
    <title>Email Template</title>
</head>
<body>
    <div>
        <h1>{{ message }}</h1>
        <p>Here's the list of items:</p>
        <ul>
            {{#each items}}
                <li>{{ this }}</li>
            {{/each}}
        </ul>
    </div>
</body>
</html>
There are 3 supported template engines at the moment:
Handlebars,LiquidandTera. You can tell OSA-Mailer how to render the template with a special magic comment at the beginning of the HTML file<--TEMPLATE [ENGINE NAME]-->(case insensitive)
🚨 At the moment, there are still standards to be formulated. It is within my hopes that once the project attracts attention, a community consensus will be established. So far, I try to avoid creating limits and only formulate what seems to me absolutely necessary. Striving for a standard is somewhat necessary so different clients and different potential backends, could still interface with each other with minimal to no modifications or adaptions
Basic E-mail
Here is a full example:
{
    "id": "fed5cadb",
    "utc": "2022-09-01T22:44:11.852662+00:00",
    "notify_error": [
        "Developers <dev-team@example.com>"
    ],
    "email": {
        "system": "My Automations System",
        "subsystem": "[ID:12345] Trigger: Server Disk Out-of-Storage",
        "from": "Ops Auto-Mailing System <tech-support@example.com>",
        "reply_to": [
            "System Admin <admin@example.com>",
            "Project Lead <lead@example.com>"
        ],
        "to": [ "Rick S. <rick_s@example.com>" ],
        "cc": [],
        "bcc": [],
        "subject": "ATTENTION! Your server is out-of-storage",
        "template": "ops_department",
        "alternative_content": "Unable to render HTML. Please refer to the Ops department for details.",
        "attachments": [],
        "unique_by": ""
    },
    "context": {
        "message": {
            "heading": "Detected Problems in Your Server",
            "body": "We have detected a disk capacity problem with one or more of your servers. Please refer to the instructions below"
        }
    }
}
Templates
The templates directory is meant to contain all templates in separated directories, with their (optional) resources and assets included, where each directory name represents the template's name.
The template index file is called template.html. In the example above, we use the ops_department template.
Under the templates directory, create a directory called ops_department and then create a text file and name it template.html
Copy the following HTML content into template.html and save the file.
Example
📦osa_mailer
┣ 📂templates
┃ ┗ 📂ops_department
┃ ┗ 🗎template.html 👈
...
<!--TEMPLATE handlebars-->
<!DOCTYPE html>
<html lang="en">
<head>
    <meta charset="UTF-8">
    <meta name="viewport" content="width=device-width, initial-scale=1.0">
    <title>Email Template</title>
</head>
<body>
    <table width="100%" border="0" cellspacing="0" cellpadding="0" bgcolor="#f4f4f4">
        <tr>
            <td align="center" valign="top">
                <table width="600" border="0" cellspacing="0" cellpadding="20" bgcolor="#ffffff">
                    <tr>
                        <td align="center" valign="top">
                            <h1>{{message.heading}}</h1>
                        </td>
                    </tr>
                    <tr>
                        <td align="center" valign="top">
                            <p>{{message.body}}</p>
                        </td>
                    </tr>
                </table>
            </td>
        </tr>
    </table>
</body>
</html>
Open Source Community Vision
Some tools are developed in workplaces for niche use-cases that repeat between different companies, workplaces and clients, where skilled workers find themselves create, write and design the same tools over and over again, having no common standard.
My vision is to create some of these tools to be publicly available for free, encourage and build an open-source community around them in order to:
- Provide a common language and standard for common niche projects
- Provide quick-to-deploy, high-quality, capable and reliable solutions to impress our bosses or clients
- Gain common, shared, technical experience around them to configure and maintain them, providing better support
- Provide higher quality of manpower for companies by providing potential workers with relevant experience for common community tools with excellent resources
- Create job opportunities for the community as they easily solve their bosses or clients problems with easy to maintain, standard community solutions
— David Krasnitsky